
Getting Started
3 step guide to get up and running
Step 1 : Create an account
- Visit www.unolo.com . Enter details & click ‘7day free trial’. Enter all details. Click ‘Submit’.
- You will receive an OTP via SMS. Click to verify your mobile number.
- Your account has been created. Go to panel.unolo.com to login to your account using the email and password you provided.
At this point you can use our interactive setup guide or continue to follow the instructions listed here.
Step 2 : Create a field executive
Create a field executive via the steps listed here.
Step 3 : Get the field executive to install the app, login and mark their attendance
- The Executive should click on the link in the SMS/email on their phone to automatically install and login to the application.
- In case they do not receive the SMS, ask them to download Unolo and enter in their login id.
- They have to follow the instructions to fix their phone settings.
- Once that is done, the executive will have to mark their attendance in.
Location Tracking
How does it work?
When an FE marks their attendance in through the app, their app’s location is recorded and their location tracking starts. Every 5 minutes (configurable), a location update is recorded and published in real time to our admin panel. Their location tracking stops when they mark their attendance out through the app.
Attendance marking can also be started automatically based on working hours as described here.
If internet is not available, data is stored and published automatically when reconnected to the internet.
What can I configure
- Location update interval
How often a location update is published. Default is 5 minutes. Lower interval values mean higher battery consumption. Higher interval values mean lower battery consumption. - Battery optimization (iPhone only)
Reduces battery use by relying on cell phone tower location only instead of high accuracy GPS data.
How do I see this real time?
Go to the Real time page.link
How to I download location data?
Download the location data from the Reports page.link
Why is the location not updating after their sign in?
One of two reasons:
- Unolo app is not allowed to run in the background, then we can’t track their location.
- Field executive has disabled GPS.
As described link when it does not work, continuous background location tracking will only work if they have allowed Unolo to run in the background AND they have their GPS enabled while they are on duty.
How to get background location tracking to be more reliable?
The best wayThe best solution is to fix their setup and compliance rating. Make sure they both get to A.
If setup rating is not A, get them to fix their phone settings to allow Unolo to run in the background at all times.
You can easily send a notification to all your field executives to do this by clicking here.
If their compliance rating is not A, inform your field executive that they should not disable GPS while on duty.
You can easily send a push notification to all your field executives to not disable their GPS by clicking here or send them a chat message.
If you are having difficulty getting your field executives to get their setup rating and compliance rating to A, then a shortcut way is to get them to just open up their Unolo app for more than 10 seconds. If they mark a visit, upload a photo or click a form then even better, at least you get some productivity measures out of it.
This is a quick fire jugaad way of tackling the problem.
Distance travelled
How do we calculate distance travelled?
From the time the field executive marks their attendance in, we start measuring the distance they have travelled.
We take the location data and ‘transform’ it into the nearest roads travelled by the employee to get a +-10-20% accurate picture of distance travelled.
We stop calculating the distance travelled when the employee marks their attendance out.
Using travels : A 100% accurate way of calculating conveyance
If you want to get a much more accurate calculation of distance travelled, field executives can use the travel feature from the Unolo mobile app.
Using this feature, before the field executive starts travelling to any location, they click on a point, a task or a client in their MapDashboard page in their app and the app does a Google directions lookup from their current location to their destination.
It presents to them the quickest and/or fastest ways in which to go. It shows them the distance and the time taken to travel by each route. The field executive has to select a route and indicate that they have started travelling.
Once they reach within 200 meters of their destination, they can end the travel. If they end the travel outside 200 meters of their destination, then the app will reperform a distance lookup from their original starting point to the current location and show them their new distance travelled.
Link to youtube video on travels for employee app.
Using this feature has two big advantages:
- Field executive gets to know the best way to travel to their destination
- Field executive knows exactly how much distance they are eligible to claim
Please note that Unolo will still calculate the distance travelled from attendance in to attendance out and show this to you in the AccuTrack page and reports.
The detail of their travel data is available ONLY in the link.
Why is the distance travelled coming much less than expected?
If we can’t get the location of the field executive while the app is running in the background, then we won’t be able to calculate distances travelled properly.
As described in link when it does not work, if the setup rating or the compliance rating of a field executive is not A for that day’s calculation, then we will not be able to calculate distance travelled accurately.
How to improve distance travelled accuracy?
The best way
The best solution is to fix their setup and compliance rating. Make sure they both get to A.
If setup rating is not A, get them to fix their phone settings to allow Unolo to run in the background at all times.
You can easily send a notification to all your field executives to do this by clicking here.
If their compliance rating is not A, inform your field executive that they should not disable GPS while on duty.
You can easily send a push notification to all your field executives to not disable their GPS by clicking here or send them a chat message.
The easiest way
If you are having difficulty getting your field executives to get their setup rating and compliance rating to A, then a shortcut way is to get them to just open up their Unolo app for more than 10 seconds. If they mark a visit, upload a photo or click a form then even better, at least you get some productivity measures out of it.
This is a quick fire ‘jugaad’ way of tackling the problem.
Compliance ratings
In order to make sure that background location tracking and distance calculations are correct, we calculate two ratings on a daily basis to help understand the quality of the location tracking and distance data.
Compliance rating
If a FE disables their GPS while on duty after signing in, the app will not be able to record their location properly in the background. While GPS is disabled, the app will not allow them to take any action such as marking attendance, work on a task or upload a photo/form.
We monitor how much time a person disables their GPS while they are on duty and give them a compliance rating:
A: less than 10% of their time on duty with GPS disabled
B: less than 20% of their time on duty with GPS disabled
C: less than 30% of their time on duty with GPS disabled
D: greater than 30% of their time on duty with GPS disabled
These ratings are visible on the AccuTrack and Compliance Status pages and downloadable reports.
Setup rating
For phones sold with custom operating systems instead of stock Android such as MI, Oppo, Vivo, Huawei and others, additional settings would be required to ensure background location tracking works at all times. Please note that this only applies to background location tracking and when you have opened the app, while the app is open their location is always being captured.
During installation, Unolo automatically guides the FE on what permissions they require and shows a subtitled video specific for their phone brand. They can optionally provide screenshots as proof that they have applied the settings correctly, these screenshots are visible in the Accu Track page and in the Compliance Status page.
To monitor whether these settings have been applied correctly, we monitor how many location updates we receive versus how many we expect and give them a setup rating:
A:less than 10% data loss
B:less than 20% data loss
C:less than 30% data loss
D:greater than 30% data loss
How to monitor and manage ratings?
The compliance status page allows you to check whether field executives have installed the app, and if they have, what their setup and compliance rating is.
You can visit the compliance status page by going to Manage > Attendance > Compliance status.
This page shows the setup rating and compliance ratings for each of your field executives last 5 working days. If the field executive has yet to login, then it shows them as “Never logged in”.
To send an installation link to people who have yet to login:
To all people : Click on the “menu” button in the box that says “never logged in”. Click on view names to see their names or click on the send SMS/email reminder to send them all instructions on how to login to the app.
To a single person: Click on the email icon next to the text “Never logged in.”
To send a notification to people who need to fix their phone settings:
To all people: Click on the “menu” button in the box that says “People who need to fix their phone settings”. Click on view names to see their names or click on “Notify” to send them a push notification which they can simply click on and the app will guide them on how to fix their phone settings to allow Unolo to run in the background.
To a single person: Click on the bell icon next to their setup rating.
To send a notification to people who are disabling their GPS:
To all people: Click on the “menu” button in the box that says “People who are excessively turning their GPS on/off”. Click on view names to see their names or click on “Notify” to send them a push notification. The push notification will inform them not to disable their GPS while they are on duty.
To a single person: Click on the bell icon next to their compliance rating.
How do I get my field executives to fix their setup rating?
One sure fire way to get field executives to fix their setup rating is to penalize their attendance if they have 5 consecutive days of bad setup rating.
Whenever a field executive will mark their attendance in through the app, it will warn them if they have had a bad setup rating the day before and will prompt them to fix. If they get 5 consecutive days of setup rating as D, then on the sixth day when they mark their attendance, they will be allowed to mark their attendance but their attendance will be marked under ‘penalty’. This will be visible in all attendance reports.
To turn this option on for your company, please email us at support@unolo.com.
Shifts/Rosters : Defining working hours
IntroductionYou can define working days, weekly offs and working hours for your field executives by using shifts and/or rosters.
By default every field executive in our system gets generated with a 10AM-6PM Mon -> Saturday shift. You can modify this as per your wish.
Shifts
Use shifts if your field executives work according to a weekly schedule. For example, you could have a field executive who works Monday through Friday, 9AM to 9PM. Saturday and Sunday would be considered weekly offs.
Rosters
Use rosters if your field executives work cycle changes week to week. For example, you could have a field executive who is working for the next 4 days, then off for the next 2 days and then working again for the next 6 days. This custom schedule can be expressed using a roster.
If you create both a roster and a shift for a field executive, the roster will be given priority.
Based on their shift/roster, Unolo can calculate the expected number of working hours for any given day.
For example, is a field executive has a single shift on a day from 9AM to 5PM, their expected working hours are 8.
For example, is a field executive has two shifts assigned via roster, one from 8AM to 12PM and another from 2PM to 10PM, their expected working hours are 4+8=12.
An administrator can visit the Shifts page by going to Manage > Attendance > Shifts.
The top panel shows the available shift templates. There is always a “default” shift template from 10AM to 6PM. Only the top level admin can create shift templates. You can create shift templates such as “Night duty” or “Morning shift” etc.
You can then drag and drop these shift templates into a user’s bucket for that day. You can also remove an already assigned shift template by clicking on the black cross button.
You can assign multiple shifts on a single day as long as the times do not overlap. For example you could assign “Morning duty” shift from 8AM to 10AM and an “Evening shift” from 2PM to 6PM.
If there is no shift defined for a day, then that day is marked as weekly off for that person.
Once you have made all changes, don’t forget to click on the “Save” button.
An administrator can visit the Shifts page by going to Manage > Attendance > Roster.
The only difference between a roster and a shift is that rosters display the next 15 calendar days instead of showing a weekly schedule.
You can drag and drop shift templates into a field executives bucket for a day just like with shifts.
If a person is not working for that day, drag and drop the “WO” (weekly off) shift template into that day.
Once you have made all changes, don’t forget to click on the “Save” button.
To make bulk modifications to shifts via excel, visit the Shifts page by going to Manage > Attendance > Shifts.
Make sure any new shift templates have already been created by the root admin, because shift templates cannot be uploaded via Excel.
Then:
- Click on the “Download shifts” button.
- Do not alter column headings. Make sure you use dropdowns for filling in the employee or when selecting a shift.
- Every row in this spreadsheet represents one field executive’s shift for one day. For every day (Monday -> Sunday) listed as columns in the spreadsheet, select the appropriate shift for that day from the dropdown column. If the person is not working that day, make sure that the “blank” (no name) shift is selected for that day.
- If a field executive has multiple shifts within the same day, say a Morning shift and an evening shift, copy and paste the entire row so that that field executive has two rows. For the days that they are working multiple shifts, put the first shift in the first row and the second shift in the second row.
- Make sure that all rows have a shift selected (including non working days which should have a “blank” shift).
- Click on the “Upload shifts” button in the admin panel.
- If there are any validation errors, it will show them to you at that time.
- Once validation has passed, it will process the file and you will receive an email confirmation once the changes have been processed.
To make upload rosters via excel, visit the Rosters page by going to Manage > Attendance > Roster.
Make sure any new shift templates have already been created by the root admin, because shift templates cannot be uploaded via Excel.
Then:
- Click on the “Download rosters” button.
- Do not alter column headings. Make sure you use dropdowns for filling in the employee or when selecting a shift.
- Every row in this spreadsheet represents one field executive’s shift for one day. For every day listed as columns in the spreadsheet, select the appropriate shift for that day from the dropdown column. If the person is not working that day, make sure that the “WEEKLY OFF” shift is selected for that day.
- If a field executive has multiple shifts within the same day, say a Morning shift and an evening shift, copy and paste the entire row so that that field executive has two rows. For the days that they are working multiple shifts, put the first shift in the first row and the second shift in the second row.
- Make sure that all rows have a shift selected (including non working days which should have a “WEEKLY OFF” shift).
- Click on the “Upload roster” button in the admin panel.
- If there are any validation errors, it will show them to you at that time.
- Once validation has passed, it will process the file and you will receive an email confirmation once the changes have been processed.
Attendance
Overview
Calculating attendance (productive working time)
You can calculate the total amount of time that a field executive is spent marked into duty on the Unolo app. And then depending on their link , we can breakdown whether the person was present, absent, half day, not working or on holiday.
In addition to time spent marked in for duty, you can define attendance based on their productive working time based on time spent at their base site, or the total time spent visiting all sites.
Read more about attendance working hours calculations link.
Manual vs auto attendance mode
A field executive can mark their attendance manually or you can configure it to turn on automatically based on their shift/roster timing (auto attendance mode). This is useful if your field executive’s are often forgetting to mark their attendance. Click link to read about manual attendance marking mode.
Read more attendance modes below.
Attendance Marking Methods (Attendance Mode)
Unolo offers you 2 different modes for attendance marking – Manual & Automatic. The mode is implemented at a Team Level i.e. Different teams can have different methods of attendance marking.
Manual Attendance Mode (Default Option)Executive has to manually mark attendance in/out in the Unolo App. Reminders to mark attendance in/out reminders are sent according to their shift/roster timings.
To setup this option, go to Preferences > Team level > Attendance
- Set “Mode” to Manual
You can further customize manual attendance mode with these two options:
Auto sign outYou can optionally choose to automatically attendance out the FE some time after their shift/roster end in case they forget to mark their attendance out. We respect FE’s privacy; we do not want to track their data after work hours.
Who should use this: If your FE’s are regularly forgetting to mark their attendance out after finishing work, you should deploy this option.
To set up this option, go to Preferences > Team level > Attendance
- Turn “Auto Sign Out” option on.
- Enter the number of minutes after their scheduled working hours completion that the app should auto sign them out.
- Within 24 hours your changes will be picked up by the field executive. If you want them to pick it up immediately, ask them to “Refresh their settings” from their Emp Dashboard screen.
Executives will be able to mark their attendance only from a specific location (site) or locations (site pools) eg. office building, work site, retail store etc.
Who should use this: If you have multiple office locations & staff rotates between these sites, this gives flexibility to mark attendance while ensuring staff has reported to work.
To setup this option, go to Preferences > Executive Level
- Make sure the “Attendance Restriction” column is shown. If it is not, click on the “Columns” button in the top right and select Attendance Restriction and click “Save”.
- Click the edit button for the field executive on which you want to enable geo-restricted attendance.
- Choose either the site or the site pool that you want to restrict their attendance to. You can only select one.
- Click on save.
- Within 24 hours your changes will be picked up by the field executive. If you want them to pick it up immediately, ask them to “Refresh their settings” from their Emp Dashboard screen.
Automatic Attendance Mode
To solve the problem of employees forgetting to mark their attendance/sign in, we offer an automatic sign in option. This allows tracking to commence according to their shfft/roster timings, thus saving the team & it’s leader precious time in follow ups & lost information due to failed log-in.
Who should use this: Anyone whose teams have pre-determined working hours and would like to implement that efficient attendance marking system that eliminates the need for reminders & data loss on account of employee forgetfulness.
`To setup this option, go to Preferences > Team level > Attendance`
- Set “Mode” to Automatic.
Now, attendance will be executive attendance in/out will be marked as per the time defined in the shift, roster or default setting. In case, both shift and roster is set, roster will be considered.
Calculating Attendance based on productive working hours
Unolo can calculate the total time they spent on duty in 3 different ways:
- Total time spent on duty - DEFAULT
Use this if you want to monitor how many hours your team is working in a day. - Time spent at their base site
Use this if you want to monitor how many hours the staff is spending at a specific location i.e. an installation site, retail store, customer location, service area, locality in a city etc. You will also get data on how many hours are spent away from this site. - Time spent at all sites in site pool
Helps you know how many hours in a working day are being spent as productive hours on site and how much time is spent travelling etc. Use this if you have staff that circulates between various work sites during the week. Eg. Teachers who have to visit 2/3 tutorial centres and conduct classes everyday – you can obtain data on how many hours they spend at the centres and how long they spend travelling; or Area Managers/Auditors who have to visit retail stores to evaluate performance on a weekly basis.
Once Unolo has computed the total time spent on duty, it determines their scheduled duty time. The scheduled duty time is determined by:
- If a roster is defined for that day, calculate total working time as sum of all shifts for that day.
- If a shift is defined for that day, calculate total working time as sum of all shifts for that day.
- If there is no shift or roster for that day, then the person has a weekly off.
Once Unolo has computed the total time spent on duty, it determines whether the executive was present, absent or half day on duty. Basis this, the monthly attendance data is obtained. We record daily attendance as:
- Absent: If working hours is less than 50 percent of scheduled duty time
- Half day: If working hours is greater than 50 percent of scheduled duty time but less than 100 percent of their scheduled time
- Present: If working hours =100% of scheduled duty time
- Not Available: No data is available for staff as they did not mark their attendance on those days.
- Penalty: Attendance penalty was applied because the field executive had 5 consecutive days of with setup rating of D (read more about attendance penalty link).
To select an attendance calculation method, go to Preferences > Team level > Attendance
- Select the appropriate Calculation method from the “Calculation Method” option.
How to monitor attendance realtime?
You can monitor attendance real time from the Dashboard, MapView or CardView pages.
How to view monthly attendance data ?
View the attendance data by visiting the Manage > Attendance > Overview page.
How to download attendance data?
Visit link
How can field executives request an attendance override?
Through the Unolo app, field executives can request a change to what attendance the system calculated on any given day. They can request an override to either half day or present.
An admin can view these attendance override requests under Manage > Attendance > Override requests. An admin can then accept or reject these requests. The admin that performs this action is audited and the overridden result is then visible in the attendance reports.
The field executive who submitted the request can also see the result of their request from their Unolo app.
How can admins override attendance calculated?
From the attendance page (Manage > Attendance > Overview):
- Click on the “Attendance Override” button
- Click on the field executive / day calculation you want to override and select a new value.
- Once you are done making changes, click the “Save” button.
Note that all overrides are audited and the results show up as “overridden” in the attendance report.
Matrix showing all options
At a Glance, use 1 option from each column to devise a customized solution for your company. Column 1 will be chosen at a team level, whereas column 2 & 3 can be chosen at executive level.
| Options for Attendance Marking /Attendance Mode | Options for setting Daily Working Hours/Schedules | Options for Attendance Calculation |
|---|---|---|
| Manual | Shifts | Daily Working Hours |
| Auto | Roster Default Setting | Time Spent at Site Time Spent at Site Pools |
Verified Auto Site Attendance (VASA)
Introduction
Unolo automatically records how long your field executives are spending at any of your sites.
When they enter a site, their ‘attendance’ at that site is recorded. The real time attendance at all your sites can be monitored through the AccuAttendance page.
The time they entered, left and total time spent is recorded and is available for download through the AutoAttendance report.
This option is useful in case:
- You want a fully automatic solution - something that doesn’t require your field executives to enter in any tasks.
- Your field executives are forgetting to mark tasks
Additionally, out of all the potential sites for your company, there may be some sites that a field executive should be visiting and some that they are not scheduled to visit. Say for example, there are sites in South Delhi that a person should regularly visit but they may also visit sites in the rest of Delhi.
To differentiate between these sites in the AutoAttendance report, you can create a site pools and link this site pool to the field executive. So, in the example listed above, you would group all South Delhi site’s together into a site pool and call it “South Delhi Sites”. You would then assign that site pool to the field executive from the field executives page.
Base site monitoring
By configuring a base site of a field executive, you indicate to Unolo this is the field executives normal operating location or a place they have to report to every day.
Once you set up a base site for a field executive:
- This site becomes their ‘expected’ location and reflects as such as on the AccuAttendance page.
- You can now start calculating attendance as a function of attendance at base site (link).
- Unolo performs much more accurate tracking of entry and exit into this persons base site.
Useful applications of VASA
- Automatic attendance at retail locations (link to case study) without requiring to install biometric machines and ask field executives to mark their attendance
- Get automatic records of how much time travelling field engineers are spending at sites without requiring them to mark tasks.
Where can I see VASA data?
You can see the real time attendance at your sites in the AccuAttendance page..
Where can I download VASA data?
You can download theAccuAttendance page.
Field Executive
Who is a Field Executive?An FE is any field employee you would like to track & manage field operations for eg. Your Sales, delivery, service, in-store, on-site teams.
The attributes of a field executive are:
- First name
- Last name
- Email ID
- Mobile number (on which Unolo will be installed)
- Reporting Manager
- Team
- Internal Employee ID (optional)
- Designation (optional)
- City (optional)
- Pincode (optional)
There are additional attributes you can set on a field executive for additional functionality:
- Base Site (refer to Sites)
- Site Pool (refer to Sites)
- Geofence (refer to Geofences)
- Attendance Restriction (refer to Attendance)
These attributes are all ‘preferences’ of a field executive and be customized for each employee.
To create a new FE, Go to Manage > Field Executives:
- Click on the “Add Executives” button in the top right. Enter in all required details and click Submit.
- The FE will automatically get an email and an SMS with an installation link and their login id.
To edit an FE, Go to Manage > Field Executives.
- Click the Edit button for the FE you want to modify.
- Make any changes.
- Click on the green tick mark to save your changes or click on the red cross button to cancel your edit.
To delete an FE, Go to Manage > Field Executives.
- Click on the action button in the extreme right column of the FE you wish to delete.
- Select “Delete User”.
Please note that deleting a FE permanently removes all their data. You may want to download reports for this employee before proceeding.
WIthin the next 24 hours, their Unolo app login will shut down and cease to operate. All clients that were visible to only that field executive will automatically be reassigned to be visible to everybody.
If your FE has left the company and you want to re-assign that login to another FE:
- Get the old FE to uninstall the app.
- Edit the field executive’s name and mobile number.
- Choose the reset device option from the right hand side action menu.
- Get the new FE to login.
To add/edit/delete FE’s via excel:
- Go to Manage → Field Executives
- Click on “Download Executives”.
- Open up the downloaded spreadsheet.
To add FE’s:
- Leave the first column “id” blank. Do not alter column headings. Do use the first couple of blank rows to populate your data. Make sure you use dropdowns for filling in the Manager, Team and Designation fields.
- Fill in remaining optional fields.
To edit FE’s:
- Do not edit the “id” column. Do not alter column headings.
- Edit any attributes you want to change.
To delete FE’s:
- Do not edit the “id” column. Do not alter column headings.
- Put a capital letter Y in the “Delete” column (the last column).
Once you have made all required changes:
- Click on the “Upload executives” button and select the spreadsheet.
- If there are any validation errors, it will show them to you at that time.
- Once validation has passed, it will process the file and you will receive an email confirmation once the changes have been processed. You will receive a count of the number of FE’s inserted/updated/deleted in that email along with a copy of the excel spreadsheet you uploaded.
To improve your administrative hierarchy, we allow you to create & assign designations to FEs.
To create a customised designation, Go to Preferences > Company Level > Designations.
Enter Details in the ‘Type to add’ box & Click on +
To assign the designation to an FE, Go to Manage > Field Executives:
- Select Edit
- Go to Designation column, Select designation from drop down list, Click Save.
- In case you cant see the Designation column, click on the “Columns” box in the top right and make Designation visible.
Reporting Managers
The Reporting Manager is the direct manager of the field executive. The reporting manager will have access to all the reports & data of their direct and indirect reportees by logging onto the Unolo admin panel. A login gets created for them when you create them in the Admins page.
To create a reporting manager, the top level admin should go to Manage> Admins:
- Click on the Add Sub Admin button in the admin box under whom you want to create the new sub admin. Fill in all the details i.e. First Name, Last Name, Phone, Email ID & Designation (optional). Remember to click on all check marks.
- Click Save (top left hand corner of the screen).
This admin will receive an email with a temporary password and will be prompted to change their password when they first login.
Click on Direct Reportees to see the list of FEs directly reporting to that manager. Since this is a brand new admin, there will be no direct reportees under them.
To assign FEs under this manager, Go to Manage → Field Executives:
- Click on the edit button for the field executive you want to change.
- Go to Reporting Manager column, Select Manager from drop down list, Click Save.
Please note that if a reporting manager is also a FE, then you need to create them additionally as a FE as well. A reporting manager login cannot be used to login to the Unolo FE app. A reporting manager needs to use their FE login to login to the Unolo FE app.
Teams
What is a team?You can create different teams of FEs for example North India, Sales team, Customer support team. You can customize options related to attendance marking or calculation, location tracking intervals, mandatory forms based on each team. All field executives in that team will pick up the options configured.
Link to company level Preferences.
- Go to Manage & Teams & +Add Teams.
- Enter Team Name & click 'Submit'.
Individually:
- Go to Preferences & Executive Level & Click Edit & Go to column ‘Team’ & Select Team Name from drop down list & Click Save.
Bulk upload:
- Link to FE upload section
Tasks
Introduction
Tasks allow field executives to record work completed at a location and link it to a client/site within the Unolo app. For example, a field sales executive could record a meeting with an end customer. Or a field technician could record a task of fixing a machine at a site.
The workflow for the field executive is simple:
- Start a task in the Unolo app
- Record description (or pick from a dropdown, see here for more details)
- Link to an existing client/site or create a new client
- Submit any photos/forms
- End the task
If a site/client is selected, verification will be performed that the field exec is currently within the site/client’s range, thus providing geo-verification. If a new client is created, the field executive’s current location will be captured as the client location.
Only fresh photos are allowed (you cannot select from gallery or any other source), so you can verify the photo was taken at that time.
You can also assign tasks for a particular date and time to your field executive at a particular location, client or site. As soon as you assign the task, your field executives will get notified and will be able to check what work they have to do on their dashboard. The field executive is only allowed to start the task if they are within range of the client/site, thus providing geo-verification again.
What can I configure about tasks?
Restrict task descriptions
If you want to restrict the descriptions that your field executives can pick from, you can enter in a set of descriptions to allow them to pick from a drop down list. To define a set of fixed descriptions, go to Preferences → Team Level → Select team → Tasks. Enter in any descriptions you would like under the “Task descriptions” table. If you want your field executive to only pick from this list and not allow them to enter in their own value, then set “Allow custom descriptions” to Off.
Enforce a form to be completed when finishing a task
If you want to enforce that a form is completed when finishing the task, you can select a form that should be displayed and completed before the task can be completed. To select this form, go to Preferences → Team level → Select team → Tasks. Select a form to be completed in the “Mandatory Completion Form” section.
Assign tasks page
An administrator can assign tasks from the admin panel by going to Manage → Tasks → Assign Tasks.
This page has three panels:
- Field executive panel
Shows a list of all field executives along with their shift/roster schedule. Click on any field executive to add/edit the tasks they have assigned. - Tasks panel
Once a field executive is selected, it shows which existing pending or completed tasks that field executive has for the day selected.
Completed tasks are shown with a green tick mark and cannot be modified. You can view the meeting information by clicking on the I (info) button.
Pending assigned tasks are shown in grey. If they are repeating, repeating icon is shown. - Map panel
Once a field executive is selected, it shows the location of all their tasks on the map in the sequence that they are shown in the tasks panel.
How do I create new tasks?
To assign tasks for a field executive:
- Select the date you want to assign the task for
- Select the field executive you want to assign the task for by searching for them and clicking on their name.
- Now you can add a task against a location, a site, a client or a set of tasks via a route.
To add a task at a location:
- Click on “Add Task”.
- Search for a particular location in the search bar above the map and then click on the map to indicate the location of the task. Where to talk about 200m radius of this task?
- Put in the task description
- Enter in an expected start and end time (optional)
- To schedule a repeating task, put in a date until which this task should be repeated daily. You can deselect any days of the week from the weekly box below for which you do not want the task to be repeated on. Please note that days that are weekly offs for field executives are deselected automatically so that you don’t accidentally assign tasks on their weekly off days.
- Click on the add task.
To add a task at a site:
- Click on “Add Task”.
- Select the site from the list of sites. You can use the site type dropdown to filter the sites by. Once you select a site, the exact location of the site is shown on the map on the right hand side.
- Put in the task description
- Enter in an expected start and end time (optional)
- To schedule a repeating task, put in a date until which this task should be repeated daily. You can deselect any days of the week from the weekly box below for which you do not want the task to be repeated on. Please note that days that are weekly offs for field executives are deselected automatically so that you don’t accidentally assign tasks on their weekly off days.
- Click on the add task.
Once you are done adding all the tasks, the task window shows you a summary of all tasks that have been added in gray and the map window shows the locations of all the tasks.
If you try to assign overlapping tasks, then the system will complain about overlapping times.
You can keep making changes for all employees and then when you are done, click on the Save button to save your changes.
What data can I capture in a task?
- You can capture 'Description' when creating a task .Apart from it you can create custom fields when working on tasks that are specific to your company operations for example : nature of task, which part needs to be fixed, etc.
- These fields would be visible on the admin panel and mobile app while creating or editing a task .
- For custom fields following options are available :
- Active: Field is shown.Note that making a field inactive permanently deletes all data stored for this field.
- Required: Field is required to be filled in.
- Delete: Delete a field permanently. Note that deleting a field permanently deletes all data stored for this field .
For more information on how to add/edit a custom field click link
How do I edit existing assigned tasks?
To edit existing tasks already assigned, go to the Assign Tasks page (Manage & Tasks & Assign Tasks ):
- Click on the date for which you want to edit the tasks for
- Click on the field executive that you want to edit the tasks for.
- The tasks pane will show what existing tasks have been assigned.
- If it’s a task at a location or site, you can click on the edit button:
- Change parameters such as expected start/end time or the location/site that the task is assigned against.
- If it’s a repeating task, you can choose to edit the task just for this date or for all dates going forward.
- If it’s a task at a client, you can only delete the task.
Once you have made all changes for all field executives, click on the save button.
Routes
What is a route?Say you have a field executive who visits the same set of sites regularly. Instead of having to define each of those sites every time, you can define a route. A route is nothing more than a list of sites, with an optional start and end timing assigned to each site.
This route can then be easily added in a single button when assigning a task.
Routes are administered through the Routes page (Manage & Tasks & Routes). Go to this page and then:
- Click on the “Create new” route button in the top right.
- Enter in the name of the route where it says “route name”.
- Select the site you want to be part of the route by clicking on the checkbox next to the site in the left hand side panel.
- Click on the “Add” button.
- Enter in any expected start time and expected end time (optional).
- Continue adding sites and expected times as necessary.
- Click on the green Save button when you are done creating the route.
- Go to Manage & Tasks & Routes.
- Select the route you want to edit from the “Select route” dropdown.
- To remove any sites from the route, click on the site in the right hand side panel and click “<<Remove”. To add any sites to the route, click on the site in the left hand side panel and click “Add”.
- Click “Save” button when you are done making changes.
See task status real time:
You can monitor the status of each task in realtime in the dashboard.
Dashboards
Dashboards are a great way to monitor location, attendance and work being performed, all real time. There are three different dashboards, each with a different perspective.
Default dashboard
The default dashboard (Dashboard) gives a real time overview of:
- Attendance broken down by admin or by team
- Current status of field executives (whether they are logged in, their attendance status, their current address and when was the last time a location update was published for them).
- Important metrics like total number of clients created, forms uploaded etc.
Map view
The map view page (Monitor → Map View) allows you to monitor real time your field executives on a map:
- Location
- Summary attendance metrics
- Online: Currently on duty (attendance in)
- Offline: Currently off duty (attendance out)
- Inactive: Currently on duty but no data update has come in 1 hour
- Not working: On holiday + not working
Task status
Clicking on the “Tasks” button on the top left allows you see all your tasks, broken down by:- Not started : Tasks that have been assigned but not yet started
- In progress : Tasks that have started
- Completed : Tasks that have been finished
You can also filter by:
- Created by: Field exec generated or admin assigned tasks
- Delayed by: If an expected start time was provided, then the delay between the expected and the actual start time.
You can also search by field executive, task address or task description.
Employee status
Clicking on the “Employees” button on the top right allows you to see, for each employee:- Name
- Attendance IN / OUT and when it was performed
- Last time data came for a user
- Whether internet is turned on
- Battery pct
- Whether GPS is turned on
Card view
This component provides a summary per field executive. It contains:
Summary attendance metrics
- Online: Currently on duty (attendance in)
- Offline: Currently off duty (attendance out)
- Inactive: Currently on duty but no data update has come in 1 hour
- Not working: On holiday + not working
For each field executive, it provides:
- Their last attendance action
- Their last address
- A summary of total tasks not yet started or completed.
- Any details of the task they are actively working on.
- Whether their internet is turned off/on
- Whether their GPS is turned off/on
- A link to their AccuTrack page for today.
Accu Attendance
This component gives you a real time status of attendance at your sites. The attendance of a site is composed like this:
At every site we present the following information:
- Present : How many field executives are currently at this site
- Expected : The total amount of field executives who have this site defined as their base site
- Absent : The number of field executives who should be at this base site (during their working hours), but are not currently at site.
- On leave : The number of field executives should be at this base site but are on approved leave today.
- Visiting: The number of field executives who are at this site but do not have this site defined as their base site.
We also present aggregated information across all your sites in the totals screen. Clicking on the Sites button in the top left brings up site level information with contact numbers for the site if defined.
AccuTrack
The AccuTrack allows you to see all the places that your field executive has been and what work they have done both on a map and as a detailed tabular view.
Every place they have spent more than 5 minutes, along with their tasks, photos and forms are all shown on a map, along with a detailed timeline view that shows total time spent at a place, address and any work performed sorted by time. It also shows the total travel distance and time spent travelling in between these places.
Its the best place to get a quick summary of a field executives day.
We also show:
- The total time tracked (their attendance hours)
- Total distance travelled
- Setup rating (available only the day after)
- Compliance rating
- Device details
What to do if AccuTrack is showing incomplete information?
If the location data is incomplete or the distance travelled is under-reported, then its due to setup rating not being A and/or compliance rating not being A.
This will clearly be highlighted in the AccuTrack page in warnings. There will be pockets of “Missing location data” during which we highlight when we did not receive any location updates from the Unolo app.
Follow link on how to increase background location tracking reliability.
Follow link on how to increase distance calculation accuracy.
Clients
Introduction
A client represents any kind of potential lead or existing/new customer that your company deals with. A client could be a distributor, a retail shop or a residential home. By creating clients in Unolo, you can :
- Maintain a CRM database along with the exact location of each client
- Record a geo-verified client meeting (refer to task section)
- Obtain real time and historical client coverage information (for example how many of my clients have been visited within the last week)
- Obtain lead generation data
Clients can be created by the field executive through the Unolo admin app or via the administrator in the admin panel. Clients created by the field executive are visible only to that field executive. Clients created by the admin panel can be made visible to a specific field executive or to all field executives.
How do define clients geographically?
Point (with radius)

You define a central location and a radius. Anything within the bounds of the circle is considered to be within the client.
Note that if a field executive tries to mark a visit against this client and they are outside this circle, they will NOT be allowed to mark a visit against this client.
Clients page
The Clients page is the one place from where an administrator can:
- View the locations of all their clients
- Add/edit/delete clients
- Add/edit/delete clients via an excel upload
You can visit the Clients page by going to Manage -> Location -> Clients
How to create a client
A client can be created/updated by the field executive through the Unolo app or by the administrator.
To create a client as an administrator:
- Go to Manage → Location → Clients
- Search for a client/address in the “Search desired places”.
- Click on “Add Clients”.
- Select the exact location of the client on the map.
- Fill in all the required attributes of the client:
- Name (mandatory)
- Which field executive(s) the client is visible to (mandatory) If you want this client to be visible to all your field executives, select “All”.
- Category (mandatory)
- Address (mandatory)
The address will be automatically captured, you can edit it if required - Description
- Client ID
Any client identifier your company has for the client - Contact person
- Contact number
- City
This will automatically be captured, you can edit if required - Pin code This will automatically be captured, you can edit if required
- Radius
This is used to set the ‘area’ within which a geo-verified task is allowed to be captured, refer to task section for more details. The default value is 200 meters. You can change the radius by editing the value or dragging the handle bars around the boundary of the client.
What data can I capture in a client?
- You can capture the following data for a client :
- Name : Mandatory
- Contact Person : Mandatory
- Contact Number : Mandatory
- Address :Mandatory
- Category
- Description
- Client ID
- City
- Pincode
- Apart from these you can create custom fields when working on clients that are specific to your company operations for example : client's age.
- These fields would be visible on the admin panel and mobile app while creating or editing a client.
- For custom fields following options are available :
- Active: Field is shown.Note that making a field inactive permanently deletes all data stored for this field.
- Required: Field is required to be filled in.
- Delete: Delete a field permanently. Note that deleting a field permanently deletes all data stored for this field .
How to add/edit/delete clients via excel?
To add/edit/delete clients via excel:
- Go to Manage → Location → Clients
- Click on “Download clients”.
- Open up the downloaded spreadsheet.
To add clients:
- Leave the first column “id” blank. Do not alter column headings. Do use the first couple of blank rows to populate your data. Make sure you use dropdowns for filling in the “Visible To” employee and category fields.
Fill in the mandatory fields:
- Name
- Which employee the client is visible to
- Either an address or the exact GPS latitude / longitude of the client if you have it available. If you fill in an address, we will use reverse geo-coding to approximate the exact location of this client. If you provide a GPS location, we will use that location.
- Contact number
- Client category
- Fill in remaining optional fields like client ID, description, contact person, city, pincode and radius (radius default is 200m if not specified).
To edit clients:
- Do not edit the “id” column. Do not alter column headings.
- Edit any attributes you want to change.
To delete clients:
- Do not edit the “id” column. Do not alter column headings.
- Put a capital letter Y in the “Delete” column (the last column).
Once you have made all required changes:
- Click on the “Upload clients” button and select the spreadsheet.
- If there are any validation errors, it will show them to you at that time.
- Once validation has passed, it will process the file and you will receive an email confirmation once the changes have been processed. You will receive a count of the number of clients inserted/updated/deleted in that email along with a copy of the excel spreadsheet you uploaded
Client reports
Link to Client Report
How to turn a client into a site?
- From the clients page, click on the “Clients” button on the top left.
- Click on the client you want to turn into a site.
- Click on the “Convert to site” button.
- Once this is done, the client will be deleted and it will be turned into a site.
How to assign a client meeting to a field executive?
Link to Assign Task Page
Sites
IntroductionA site represents a location of interest to your company. A site could be a warehouse, a cell phone tower location, retail store or a college campus.
You can also define site pools, which are basically a collection of sites.
By creating sites/site pools in Unolo you can:
- Record a geo-verified task at a site
- Assign Task at sites
- Restrict attendance to a site / site pool
- Get metrics on how much time your field executives are spending at your sites vs travelling, completely automatically, through our Verified Auto Site Attendance (VASA) feature (refer to vasa section).
- Monitor how long field executives are at a base site.
As opposed to clients, sites can ONLY be created by an administrator through the admin panel. Sites are visible to field executives, but they cannot create or modify them.
You can categorize sites into “types” for classification purposes. For example you could create a site type “warehouse”, “retailer” or “college”.
To create a site type, go to Preferences > Company level > Sites.
Here you can add and delete any site types you wish. By default, we always create a site type of “Default”. You can alter this as you see fit.
| Point (with radius) | Region (custom shape) |
|  |
| You define a central location and a radius. Anything within the bounds of the circle is considered to be within the site. Note that if a field executive tries to mark a visit against this site and they are outside this circle, they will NOT be allowed to mark a visit against this site. | You define a custom closed shape. Anything within the shape is considered to be within the site. Note that if a field executive tries to mark a visit against this site and they are outside this area, they will NOT be allowed to mark a visit against this site. |
| Useful for: small offices, small retail stores, etc. | Useful for: larger offices, college campuses, tea plantations. |
The Sites page is the one place from where an administrator can:
- View the locations of all their sites
- Add/edit/delete sites
- Add/edit/delete sites via an excel upload
To create a site the administrator:
- Go to Manage → Location → Sites
- Search for a client/address in the “Search desired places”.
- If adding a point site:
- Click on the “Add Point” button
- Select the exact location of the site on the map
If adding a region site:
- Click on the “Add Region” button
- Click on any point on the map which is the boundary of the site.
- Continue clicking on the map to outline the boundary of the site.
- Make sure to click back on the point that you started drawing the boundary of the site with.
- Fill in all the required attributes of the site:
- Name (mandatory)
- Address : automatically filled in with the first point you clicked, you can edit if required
- Description
- Site ID
Any identifier your company has for this site - Contact person
- Contact number
- City
This will automatically be captured, you can edit if required - Pin code
This will automatically be captured, you can edit if required - Site type
- Radius (only applicable for point based sites)
The default value is 200 meters. You can change the radius by editing the value or dragging the handle bars around the boundary of the client. Minimum value is 50 meters.
Go to Manage > Location > Sites.
- Click on the “Sites” button on the top left.
- Click on the site that you want to edit.
- Click edit.
- You can now move the site by clicking and dragging it.
- If it’s a point based site, you can change the radius by editing the value or dragging the handle bars around the boundary of the client.
If it’s a region based site, you can click on the circles around the boundary to drag them and edit the shape. - Once you are done, click “Save”.
To add/edit/delete sites via excel:
- Go to Manage → Location → Sites
- Click on “Download sites”.
- Open up the downloaded spreadsheet.
Please note that you can only download point based sites into excel. Region based sites will not be downloaded and cannot be edited via excel.
To add sites:
- Leave the first column “id” blank. Do not alter column headings. Do use the first couple of blank rows to populate your data. Do make sure you select the site type from the dropdown option.
Fill in the mandatory fields:
- Name
- Either an address or the exact GPS latitude / longitude of the client if you have it available. If you fill in an address, we will use reverse geo-coding to approximate the exact location of this client. If you provide a GPS location, we will use that location.
- Fill in remaining optional fields like description, contact number, contact person, city and pincode.
To edit clients:
- Do not edit the “id” column. Do not alter column headings.
- Edit any attributes you want to change.
To delete clients:
- Do not edit the “id” column. Do not alter column headings.
- Put a capital letter Y in the “Delete” column (the last column).
Once you have made all required changes:
- Click on the “Upload sites” button and select the spreadsheet.
- If there are any validation errors, it will show them to you at that time.
- Once validation has passed, it will process the file and you will receive an email confirmation once the changes have been processed. You will receive a count of the number of sites inserted/updated/deleted in that email along with a copy of the excel spreadsheet you uploaded.
Go to Manage > Location > Sites.
- Click on the “Site pools” button on the top left.
- Click on “Add site pool”.
- Give the name to the site pool.
- Click save.
Go to Manage > Location > Sites.
- Click on “Site pools” button on the top left.
- Click on the site pool you want to edit.
- A list of sites within that pool are shown. Click “Edit” to edit that site pool.
- A list of all available sites is opened up on the right hand side, with sites already there pre-checked. Select any new sites to be included.
- Once you are done, click “Save”.
Geofences
IntroductionIf you want to know when a field executive enters or exits an area, you can define a geofence assign that to a field executive as their “Geofence” option.
Alerts will be generated and shown on the AccuTrack page whenever that field executive enters or exits that geofence. These geofence alerts will also be shown on the location reports.
If you want to monitor multiple geofences, then create a geofence pool. A geofence pool is a collection of geofences. You can also assign a
Region (custom shape)
You define a custom closed shape. Anything within the shape is considered to be within the geofence.
Useful for : larger offices, college campuses, tea plantations.
An admin can go to Manage & Locations & Geofences:
- Click on the “Add Geofence” button
- Click on any point on the map which is the boundary of the site.
- Continue clicking on the map to outline the boundary of the site.
- Make sure to click back on the point that you started drawing the boundary of the site with.
- Once the shape is drawn, enter in the name of the geofence in the window that opens up and click “Save”.
Go to Manage & Location & Geofences.
- Click on the “Geofences” button on the top left.
- Click on the geofence that you want to edit.
- Click edit.
- You can now move the geofence by clicking and dragging it.
- You can also edit the shape by clicking on the circles drawn around the border and moving them.
- Once you are done, click “Save”.
Go to Manage & Location & Geofences.
- Click on the “Geofence pools” button on the top left.
- Click on “Add geofence pool”.
- Give the name to the geofence pool.
- Click save.
Go to Manage & Location & Geofences.
- Click on “Geofence pools” button on the top left.
- Click on the geofence pool you want to edit.
- A list of geofences within that pool are shown. Click “Edit” to edit that geofence pool.
- A list of all available geofences is opened up on the right hand side, with geofences already there pre-checked. Select any new geofences to be included.
- Once you are done, click “Save”.
Forms
IntroductionForms can be used to digitize any data collection you are doing today. You can use them to capture work done at a maintenance site, lead generation, stock keeping and many more. Unolo also captures the exact location a form was submitted from.
Simply create a form, give it a name, and then your field executives can immediately fill out the forms from within the Unolo app.
Submitted form data can be seen from the AccuTrack page or by downloading the “Tasks” report from the reporting section.
The types of form elements available are:
- Text area
- Text
Use this to capture any alphanumeric data like the name of a customer, product or service. - Number
Use this to capture any numeric data like price, age, quantity. - Address
Use this to capture an address. When opening the form, the current address will be shown and can be modified if required. - Date
Use this to capture a date.
- Text
- Dropdown
Use this to select one value from a list of possible options. You can provide a list of possible options. - Check Box options
Use this to select one or more values from a list of possible options. You can provide a list of possible options.
To design your own custom form, go to the Form Builder section (Manage -> Form Builder).
You will be shown a brand new form.
- Enter in the name of the form where it says ‘Form Name’.
- Click on the + button and select a type of form element.
- Enter in the name of the question (for example, Age of customer) where it says “Question”
- For a “Text area” type, select the type of text.
- For a “Dropdown / Checkbox”, enter in the list of possible values.
You can force an answer to a question by marking the question “Required”.
You can change question order by clicking on the “=” handlebar icon above each area and moving them.
Once you are done, click on the “Save” button.
To edit an existing form, go to the Form Builder section (Manage -> Form Builder). Click on Open Form, select the form and click “Open”.
Please note that it is not advisable to change a question once it has been created. It is better to create a new question and delete the existing question. This is because the existing answers to the question will lose their context.
Now you can add, remove or re-order any questions in the form.
Once you are done, click on the “Save” button.
You can see submitted form data from the:
- AccuTrack page.
The location from where the form was submitted is shown on the map. The submitted form data is can also be seen in the Timeline view. - Download the Tasks report from the reporting page. Click on the “Form” sheet. All form data will be presented, along with details about who, when and where the form was completed.
Photos
IntroductionPhotos are a useful way to show what field work has been completed. It can provide additional context about a client, serve as proof of maintenance work completed or for capturing the state of a machine.
Field executives can upload only fresh photos from the Unolo application. They cannot upload photos from gallery or from any other location. The exact location and the time the photo was taken is also stored by the system.
You can see photos from the:
- AccuTrack page.
The location from where the photo was submitted is shown on the map. The photo is also visible from this page. - Download the Tasks report from the reporting page.
Orders
Introduction
To indicate any sale and/or collection done, your field executives can book an order through the Unolo app. As soon as an order is generated, a PDF sales invoice is generated (based on the template you provide). An order contains the following attributes:
- One or more items from your product catalog
- (Optional) A client
- (Optional) Any email recipients you want a copy of the PDF sales invoice to go to
- (Optional) One or more payments
To get started booking orders, an administrator needs to:
- Define theirproduct catalog
- Customize theirsales invoice template.
If a product is out of stock or is not available for whatever reason, you can mark it as inactive. You can do this by visiting the Products page from Manage → Orders → Products. When you mark a product as inactive, it is not visible to field executives in the Unolo app when they book an order.
What can I configure about an order
Default email address
In addition to the email recipients listed on the order, you can configure a copy of the PDF sales invoice to always be sent to one or more email addresses, without the field executive having to add a recipient. These email addresses can be configured by going to Preferences -> Team Level -> Orders. Add any emails into the “Order recipient section”.
How do I define my product catalog?
Go to Manage → Orders → Products
To add one or more products from the web page:
- Click on the “Add Product” button in the top right
Define the following attributes of the product:
- SKU Name
Name of the product (example Sunfeast Biscuit 100g) - SKU ID
SKU of the product - SKU Description
Description of the product - Category
Any category you want to assign to the product (example Biscuits) - List price
The list price of the product. The field executive can change this price when booking the order.
- SKU Name
- If you want to add more products, click on the “Add Row” button on the top right.
- Once you are done, click on the Save button.
To add multiple products in a bulk upload:
- Click on the “Download excel” button in the top right.
- Open the downloaded spreadsheet.
- Delete all existing rows.
- Add in new rows for all the new products you want to define.
- Make sure you populate the Active column with the value “true” for all new products defined.
- Click on “Add Product” button in the top right corner of the Products page in the admin panel.
- Click on “Upload Excel” button.
- All the products defined in the spreadsheet will be loaded into the dialog box.
- Make any changes as required.
- Click on the Save button to create all the products.
How do I customize my sales invoice?
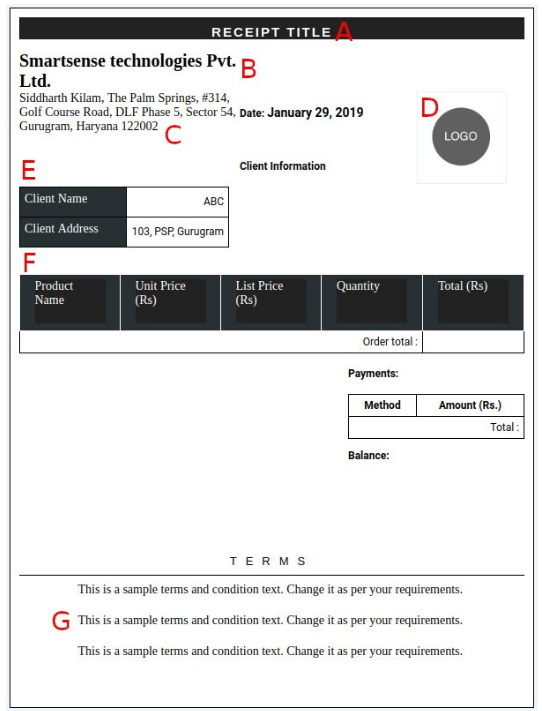
Go to Manage → Orders → Receipt Template.
It shows a sample receipt template that you can modify and fill in with custom values. To edit a value, just click on it. Once you are done making changes, click on the Save button. If you want to reset back to default, click on the Reset button.
This is a description of each of the components of the template:
- Title of receipt
- Company Name
- Company Address
- Logo of your company
- Client name and client address (if linked while booking the order)
- Product details. Click to edit any of the default columns.
- Terms and conditions.
Link to report section
Expense Management
IntroductionWhile at work, the executives incur various expenses that need to be reimbursed by the company. Unolo allows the executive to submit an expense reimbursement request via the app & the admin/ manager can approve/disapprove the same via the admin panel.
In Unolo there are two categories of expenses:
- General expenses
Any kind of expense related to accommodation, food, phone bills etc. - Conveyances
Any kind of expense related to travel.
We have a special category for conveyances because we show additional information to the admin in the approve/reject page to help them make a decision.
The Field Executive (FE) can submit an expense claim via the app. Here’s how:
- In the app, Go to Expenses > Click on + > Select Add Expense/ Add Conveyance
- Enter Description, Click on + button to add expense/ photos
- Click Save
Unolo offers you the option of customising your expense workflow. You can:
- Define per km reimbursement rate for car and/or bike
- Define per km reimbursement rate for car and/or bike
- Define Customised expense codes & categories (types)
To customize these settings, the administrator can go to Preferences> Company Level> Expense Settings. Herein:
- For Car/Bike reimbursement
Enter numeric value for per km reimbursement. Based on the travel distance submitted by the FE on the app, the reimbursement amount will be automatically calculated. Admin authorization method:
Admin hierarchy (default) : Expense claims will be directed to immediate Admins/reporting manager for approval. Once the immediate admin/report manager approves, it goes to that admin’s parent admin for approval and continues going until the root level admin is reached.To select this option, go to Admin Authorisation Method> Select “Admin Heirarchy”.
Custom fixed authorization levels:
Instead of following the admin hierarchy, you can choose three fixed approvers that the expense will follow for claims. Any admin already created in the system can be chosen as an approver.To select this option, go to Admin Authorisation Method> Select Custom fixed authorization levels. Select 3 approvers from the list.
- Expense Categories
Define these to standardize expense claims submitted by employees. Enter the details in the ‘Type to Add’ box, click on “+”. - Expense Codes
Define these to standardize expense claims submitted by employees. Enter the details in the ‘Type to Add’ box, click on “+”.
All pending expense/conveyance claims and previously actioned expense/conveyance claims are visible from the Expenses page. Go to Manage > Expenses to see this data. You will be able to see claims for all field executives reporting directly and indirectly into you.
You can filter by Expenses and Conveyances via a tab on the top left. You can filter by field executive or by a date range to filter the claims.
Each pending expense has the summary detail. To view additional details, including evidence, click on the “+” button next to the claim. You can also view the audit trail of expense approvals/rejections i.e. date of claim approval/rejection, approver name, claim amount etc.
For Conveyance expenses, you can see the distance claimed (as submitted by the FE) & calculated distance (automatically calculated by Unolo) and the difference between the two. This will help you identify any glaring irregularities between the claim submitted & the actual travel of the FE.
To approve/reject the claim:
- Go to ‘Pending Requests’. In case, the amount claimed is incorrect, you can enter the correct amount in the box under ‘Reimbursement Amount’.
- Click on ‘Approve/ Reject’ under Action column.
If approved, the claim will then go to the next admin in the approval chain (based on the admin authorization method setting).
Download the expense report
Leave Management
IntroductionYou can use Unolo to manage your executives leaves & assess number of days worked, casual, sick leaves taken, holidays etc. A Field Executive (FE) can request for leaves via the app & his direct manager can approve/disapprove of the same from the admin panel.
The FE will submit a leave application via the app. Holidays > Click on + > Enter start & end date for the leave> Enter Reason> Click Submit.
The admin/reporting manager will be able to view/approve/disapprove the leave application via the admin panel:
- Go to Manage > Leaves
- Herein, you can see the Pending Leave Requests & Live History of the executives.
- You can choose the time period & executive for whom you wish to see the leave data.
- Thereafter, approve/disapprove the same by clicking on the appropriate box (under Action column). In case of rejection, the manager will have to specify reason for rejection and click Submit.
- The field executive will be able to see the result of the request through their Unolo admin app.
Preferences
Introduction
The preferences section allows you to customize Unolo for your usage. Go to the Preferences page to view this information.
Company level
Account
- Timezone : What timezone your company is configured for. All timestamps will be shown with respect to this timezone.
- Currency: What currency all orders are booked in.
- Designations
- Car rate
- Bike rate
- Admin authorization method
- Expense Codes
- Expense Categories
- Site Types
Team level
Attendance
- Mode
- Auto Sign
- Authentication (iPhone only)
When marking attendance, use available biometric authentication to make sure that the person marking their attendance is the person who owns the phone. - Calculation method (link here)
- Location Update Interval
- Battery optimization
- IMEI Validation : available on Android only and only on Android 9 and below.
This option only allows the field executive to login from a specific device. It requires additional permissions to capture their IMEI number.
In general, phone manufacturers are starting to starting to restrict access to this information, so we do not recommend setting this option on.
- Mandatory Completion Form
- Task descriptions
- Order Recepient Emails
- Go to Preferences > Company Level >Custom Fields> Clients or Tasks.
- Click on the ‘ Add New Field’ button.
- Enter the name of the field and the input type. Depending on the requirements you can select one of the following input types :
- Date : Provides a datepicker.
- Checkbox : MultiSelect options
- Dropdown : Single Select options
- Number : Any integer or decimal value
- Text : Plain Text
- Click on submit.
- When selecting input type checkbox or dropdown, at least one input value i.e. option is mandatory to provide.
- Go to Preferences > Company Level >Custom Fields > Clients or Tasks.
- To edit the name of the field click on the pencil icon , make changes , and after completion click on the green tick.
- To mark a field as inactive or required use toggle icon next to the name of the field.
- Note that making a field inactive or deleting a field , permanently deletes all data stored for this field.
- To edit an option one can make changes in the option’s text box directly .Editing an option does not affect the data associated but deleting an option deletes all the associated data.
Executive level
- Base site
- Site pool
- Reporting manager
- Geofence
- Attendance restriction
Reports
To download reports, an administrator can go to Reports page.
Click on any report you wish to download, select a date range and select the field executives that you want to download the report for.
Summary report
The summary report contains information about distance travelled, attendance, work completed and ratings (setup and compliance) for each employee.
The employee breakdown tab shows aggregated data for the date range specified:
- Field executive
- Total distance travelled
- Average Setup rating
- Average Compliance rating
- Total time tracked (hrs)
- Total clients created
- Total number of tasks
- Total time spent at tasks
- Total photos upload
- Total forms uploaded
The date breakdown tab shows the same information except aggregated by a single day for the date range selected.
The detail breakdown shows unaggregated information per field executive per day.
Attendance report
The attendance report provides information about each field executives attendance.
The Summary tab contains aggregated information for the date range specified when download the spreadsheet:
- The total number of days they were counted as present
- The total number of days they were counted as half attendance
- The total number of days they were counted as absent
- The total number of days they were counted as not working
- The total number of days they were counted as penalty days.
- The total number of days
- The total number of days the field executive marked their attendance in late.
- The total number of days the field executive marked their attendance out early.
- The total number of attendance hours.
The quick tab contains a date wise report for all employees showing just:
- Their first sign in time
- Their last sign out time
- Whether they were present, half day, not working, absent, penalty
The detail tab contains detailed data for each field executive for each date:
- The time they marked their attendance in (could be multiple)
- Whether their attendance was marked in late (according to their working hours)
- The time they marked their attendance out (could be multiple)
- Whether their attendance was marked out early (according to their working hours)
- Total attendance time
- The result of attendance (present, absent, etc)
- Distance travelled
- Setup rating
- Compliance rating
- Their expected working hours that day according to the shift/roster template on that date
- When their attendance was overridden (if at all).
Location detail report
The location detail report shows similar information to what we show in the AccuTrack report. It contains, for every field executive for every day:
- A list of all the places that they spent more than 5 minutes, with the start, end and total time spent at that place. The exact GPS lat,long of that place is also provided. The battery life at that place.
- The summary of how much they travelled in between those places
- Detail about any missing data
- A map which shows each of the places they visited with markers starting from A, B, C onwards.
Travel detail report
The travel detail report shows all travels marked by the field executive.
The Summary tab contains for the date range selected, for each employee:
- The number of travels recorded
- The total distance of those travels.
The Travel Detail tab contains for each travel marked by a field executive:
- Field executive identification information
- Details about the task that they marked the travel to.
- The starting point latitude, longitude and address.
- The destination point latitude, longitude and address.
- The distance travelled.
- When the travel was started and ended.
- When the associated task was started or ended.
- The total task + travel time.
- If the original destination point was not reached, then the original destination address, GPS coordinates, distance and time taken.
Task details
The task details report contains all information about tasks, photos and forms submitted by your field executives during the date range selected.
The “Tasks detail” tab contains:
- Date
What date the task was started - Manager/Employee/Designation/ID/Team
Self explanatory - Task ID
Unolo unique ID per task
Scheduled start/end time - Scheduled start/end time
What time the task was scheduled to start/finish - Actual start time/end time
What time the task actually started/finish - Start/End time difference
Difference between scheduled/actual start/end time in minutes. - Total time spent
Total task time between start to finish (minutes) - Description
Description of the task - Client/Site
Name of the client/site that the task was performed at - Name
If linked to a client/site, then the name of the client/site. - Address
The address of the task - Phone
If linked to a client/site, then the contact number of the client/site. - Photo 1/2/3
Any linked photos - Form
Any linked form
The “Forms detail” tab contains for each unique form filled in during the time period in question:
- It’s name
- What date it was uploaded
- Who uploaded
- The latitude and longitude of upload
- The address from where it was uploaded
- If the form was submitted while in a task linked to a client, then the client information
- Each question in the form as a column with the values filled out.
The “Photos detail” tab contains data for each photo uploaded during the time period in question. If there are less than 500 photos in the report, then the photo will be embedded into the spreadsheet. If there are more than 500 photos or more in the report, then a link to open the photo will be given in the spreadsheet. This is done to keep the size of the excel report manageable.
Client report
There are two types of client reports available:
- Lead generation report
Shows how many clients have been generated based on the employees and date range selected. - Client coverage report
Shows how many tasks have been marked against a client based on the employees and date range selected. For more information on tasks, please visit the tasks ection.
Order report
The orders report contains 4 tabs:
- Orders Details
A list of each order including details of which field executive created the order, the items in that order and any collections marked as part of that order. - Aggregated Details
One row per order, including details of which field executive created the order and the items in that order. - SKU Details
One row per item per order, including details of the item and any client that was linked to the order. - Collection Detail
Details of each collection made against every order, including details of the field exective who created the order and the details of the payment.
Sales report
The sales report contains a combination of summary and order data which is particularly suited to review sales performance.
Employee breakdownFor every field executive, it shows in aggregate across the date range specified:
- Locations visited
- Total number of tasks
- A breakdown of new clients created (by client category)
- Number of orders booked
- Total amount of payment collected
- The last location of the day
- Total distance travelled
- Total number of photos taken
Same information as employee breakdown tab, but broken down by date instead of by employee.
Detail breakdownSame information as employee breakdown tab, but broken down by employee and by date.
Expense report
Expenses tabThe expense report shows, for each expense submitted by your field executive:
- The date marked on the expense
- When it was submitted
- Field executive information
- The description of the expense
- The total amount claimed
- The amount that each admin in the approval chain has said that they can claim (if any)
- The overall status of the expense claim (pending/approved/rejected)
- Any comments
- Rejection reason if rejected
- Any photos submitted along with the expense request
- The date marked on the expense
- When it was submitted
- Field executive information
- The description of the expense
- The total amount claimed
- The amount that each admin in the approval chain has said that they can claim (if any)
- The distance that Unolo calculated for that field executive for that day
- The overall status of the expense claim (pending/approved/rejected)
- Any comments
- Rejection reason if rejected
- The number of km travelled by car, bike or by public transport.
- Any photos submitted along with the expense request
Auto Attendance report
The auto attendance report gives a summary of all data generated by VASA.
This report contains one row per field executive:
- The name, manager and ID of that field executive.
- The date
- The total number of sites visited on that date
- All the sites visited on that date, giving total time spent at each site and the individual breakdowns of each visit into the site.